Showing posts with label Breads. Show all posts

Tuesday, January 17, 2012

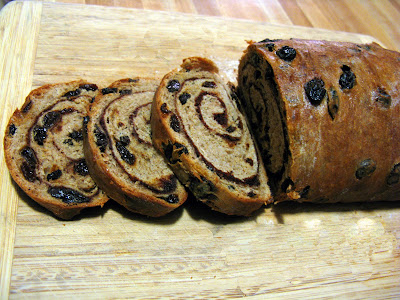
Cinnamon-Swirl Raisin Bread

I've had a hankerin' for cinnamon raisin bread for a while now.  It's one of my all-time favorite breakfast treats, and once I get the craving I can't seem to get it out of my mind.  Our local breakfast place doesn't serve it and it's becoming scare as hen's teeth to find it on on our grocer's shelves and when I do find it, the cost is the price of a second mortgage for a good quality loaf.  All I really want is a couple of nice pieces to satisfy my craving.  I know me, if I have a whole loaf, I'll eat it. 

So, I bought a Fine Cooking magazine and lo and behold was a cinnamon-raisin swirl bread recipe.  Is that a divine hint or what?  So, I  dug out my bowls and pastry mat and ingredients and set to make this.

As my grandmother would say, "I'll tell you what..." if you had a loaf of this you'd be hard pressed not to eat an entire loaf in one sitting.   This Fine Cooking recipe is chuck a block full of plumped, juicy raisins  that are added into the dough and a ton of cinnamon, added to the dough and then as part of the filling.  There is absolutely no skimping.   

A couple of caveats:  This is a sticky dough, but not as wet as a  batter bread.  Just stay with the directions; more flour is added later on, but only when it's time to roll it out.

This dough has three risings.  I confess to messing up and only doing two.  Now I'm not sure if it's my cool New England kitchen or the recipe itself (minus the middle rising or could it be the instant yeast had gone past date?), but this bread did not rise well at all for me.  My warm place is setting the loaf pans in a plastic tent in the sun on my kitchen table, and that usually works very well.  When I saw the dough was still not rising, I put my oven on warm, left it on for about 30 seconds, and put the pans of dough in the oven for about 2 hours.  Still the dough didn't rise to bread dough filling the pan.  I baked it anyway, and the bread rose a little more while baking, but still not to the height of  the big loaves I made here.  It took me a couple of minutes to figure out that my older recipe called for double the flour, etc., but not nearly the amount of raisins and cinnamon, smiles.  These Fine Cooking loaves are apparently meant to be small.

These loaves are dense.  In reading the reviews at Fine Cooking, I see that another baker made the same observation, so I want to think (smiles) this is to be expected. 

In the final analysis, this is truly a very good, almost superb, cinnamon-raisin bread.  My chief complaint of other recipes is that the cinnamon and raisins were skimpy and fell out of the rolled bread. My chief complaint with this one is the heaviness of the smallish loaves, which is richly overcome by the abundance of raisins and cinnamon.  Plumping the raisins and adding them directly to the dough along with a generous portion of cinnamon and sugar is positively genius.

Cinnamon-Swirl Raisin Bread
(found at http://www.finecooking.com/recipes/cinnamon-swirl-raisin-bread.aspx)

2 cups dark raisins
light-flavored oil to grease the bowl (such as canola or grapeseed)
4 cups (18 ounces) unbleached, all-purpose flour plus more for dusting (I used King Arthur's flour)
6 tablespoons sugar, divided
6 tablespoons cinnamon, divided
1 packet  (1/4 ounce or 2 1/4 teaspoon) instant yeast
3/4 cup lukewarm water
2 teaspoons salt
1/2 cup whole milk
1 large egg
3 1/2 ounces (7 tablespoons) unsalted butter, softened, plus more for the pans

First plump up the raisins.  Put them in a large measuring cup or bowl and add enough hot water to cover them.  Allow to sit for five minutes and then drain them.

If you are fortunate enough to have a stand mixer, this would be a good time to use it, otherwise you can do this by hand, it's just a little work. 

 In a large bowl, combine the flour, 2 tablespoons each of the sugar and cinnamon, the yeast, and salt. Mix (or whisk) until well combined.  Add the milk, egg, tablespoons of the butter, and 3/4 cup room temperature water.  Mix until well combined, until the dough comes together.  Continue to mix until the dough is smooth and slightly sticky.   Add the raisins to the dough and gently knead in by hand.

For the first rise:  Turn the dough out onto a well-floured surface, roll it into a ball,.  Clean the bowl you were just using, lightly oil it, and put the dough in the oiled bowl. Cover loosely with plastic wrap and let sit at room temperature until the dough looks slightly puffy, about 30 minutes.

For the second rise:  On a well-floured surface, use your hands to flatten and spread the dough out until it’s about 3/4 inch thick. Fold the dough in half from top to bottom, then in half again from left to right. Return the dough to the bowl, cover, and let sit until it has risen slightly, about 30 minutes more.

For the third rise: Lightly grease two 8" x 4" loaf pans with butter.

Starting from the short side, gently roll each rectangle into an 8-1/2-inch-long cylinder. Put the cylinders in the pans, seam side down. Cover loosely with plastic wrap. Let rest at room temperature about 60-90 minutes.  The dough will spring back when lightly poked.

Bake:  Position a rack in the center of the oven and heat the oven to 375°F. Bake the loaves, rotating and swapping the positions of the pans halfway through baking, until dark brown and hollow-sounding when thumped on top and an instant-read thermometer inserted in the center of the loaves registers about 190°F, 30 to 35 minutes. Transfer the loaves in their pans to a rack


Melt the remaining butter and use it to brush the tops of the loaves.  When cool enough to handle, tip the loaves out onto the rack to finish cooling.  Try and wait before slicing into the bread!

Bread stays nice for about five days.  Doubt if you can make it last that long!


Monday, December 19, 2011

Danish Pastry

 I am a great admirer of beautiful pastries and cakes and have long believed that I did not possess the wherewithal to make anything so beautiful as a Danish pastry in my own tiny kitchen.  However, after seeing a post on Soap Mom's Kitchen for Danish pastry, I was encouraged.  If you have not visited Soap Mom's Kitchen, I hope you do.  She has so many delicious recipes and photographs of beautiful foods she's made that will both delight and inspire you. Take a look at some of the celebration cakes she's made...oh my!!

The recipe is going to look long and complicated, but, let me assure you, it is not!  The majority of time is resting and rising time, with the longest resting time being overnight in the refrigerator.  There's no kneading, just rolling.  A final pinching of the dough at the end, and filling and glazing and you will have pastries that will earn you big wows and oodles of aaahs. 

Roll up your sleeves.  Take a breath.  You can do this.  It's easy peasy, lemon squeezy.  Take one easy step at a time and remember to start these a day in advance.

Danish Pastry

Cheese Filling
1 8-ounce package cream cheese
1/3 cup sugar
1 egg yolk
1 teaspoon vanilla extract
Combine and mix well.

Honey Glaze
1/3 cup honey
2 teaspoons water
Heat in a microwave safe bowl and use a pastry brush to glaze the baked Danish.

Confectioner's Glaze
3/4 cups confectioner's sugar
1 teaspoon of water (or enough to achieve desired consistency for drizzling)
Mix well.  Use to drizzle on top of cooled Danish.

Optional but nice
Jam or preserve  or curd of choice to add on top of the cheese filling
Toasted sliced almonds

Oven 350* F.
Parchment-lined or generously greased cookie sheet.

* * * * * * * * * * * * *

For the yeast dough starter, put into a small bowl, like a custard cup, or one cup measuring cup, the following ingredients:
1/4 cup warm water (105*F to 115*F)
1 1/2 teaspoon active dry yeast
1 teaspoon sugar
Wait 5 to 10 minutes to activate the yeast; it will be bubbly.

In a separate large bowl add and whisk together
1/2 cup milk at room temperature
1/3 cup sugar
1 egg
1 teaspoon salt
Set aside.

In a food processor add
2 3/4 cups flour
2 sticks cold, unsalted butter
Process only until butter forms large clumps.  Do not overprocess into a meal.  You want to see clumps of butter.  Have another 1/2 cup of flour in reserve to bring the dough together into a soft ball.

In the bowl with the egg, milk, sugar mixture add the yeast dough starter. Mix well.  Add flour-butter mixture, and using a spoon bring the dough together.  You can mix the dough with your impeccably clean hands as well.  Using the reserved 1/2 cup flour, bring the dough together to make a soft dough ball.  Do not overwork the dough as you do not want to melt the butter.  Grease the bow slightly with vegetable oil and gently turn the dough over in the bowl to lightly coat the dough ball with the oil. Cover and refrigerate overnight.


The next day, on a well floured surface, roll out the dough into a large 16-inch square and fold into thirds.

(Note that there are still big pieces of butter.)


Fold into thirds again.  Wrap in plastic wrap and refrigerate for about 30 minutes.

Take the dough out and roll again into a 10 x 20 rectangle and refold as before.  Cover and refrigerate.  Do this for a total of 3 times.


After the third roll into a 10 x 20 rectangle, cut into strips. (I used a ruler and made 1-inch wide strips).  I cut the long way, but in hindsight, I think it would have been better to cut these into strips from the short side.  The long strips made the dough circles too large, and I ended up cutting them in half.

 Take two strips and twist them, forming the twisted strips into a circle and pinching the ends together. 


Pinch the inner part of the ring all the way around towards the center to make a base for the filling.  Spray the tops of the danish with spray release and cover gently with clear wrap.  Let rise for about 35 minutes in a warm spot or until proofed.  (My Danish were uneven in size, but nobody cared, smiles.)


Add filling and a tablespoon of preserves on top of the cheese if you wish.  Bake in a 350*F oven for about 18 minutes or until golden brown. 

Glaze with honey glaze, a drizzle of confectioner's glaze, and if you want to guild the lily, a few toasted sliced almonds.


One of the beauties of this recipe is that the dough can be prepared ahead of time, frozen, defrosted, and finished off at your pleasure. I did this, and it worked wonderfully.

To prepare in advance and then freeze, prepare the dough up to and including twisting the strips into a circle. Spray with the pan release, put on a tray and place in your freezer for a couple of hours. Once completely frozen, remove the pastries from the freezer and store in a plastic bag. When you are ready to bake, defrost the rings (they defrost quite quickly) and proceed with pinching the inside of the rings towards the center to make the base for the filling. Allow to rise and then bake and glaze.

I confess to cheating a little with the rising. I had packed these up to take to a family gathering, and not being in my own kitchen and being a bit underfoot, I put the Danish in the oven not fully proofed. The dough must be very forgiving as they rose beautifully and no one was the wiser.

There's quite a bit of sweetness going on with these. The next time (and there will be many next times!) I think I'll go with unsweetened jam, as I used a regular raspberry preserve. The purchased lemon curd I used was positively divine in this.

Wednesday, September 7, 2011

Everlasting Yeast and a Bread Recipe


I think you know by now that I want to encourage those who are yeast shy to at least try and make a loaf of bread.  I've posted a couple of recipes on my blog here that are perfect for beginners, no kneading and yeast batter breads, and then a couple of other breads once you've built up your confidence.  I am by no stretch of the imagination an expert, but I've made more homemade bread than a lot of folks so I say with humility that I think I have a feel for it.  And it's a good thing, because you'll need it for what I want to share with you.

If you ever wanted to try your hand at making homemade bread,  this is absolutely not the one you want to be your first. No, it's not difficult, there's no kneading, so that's not it, but it does require a "feel" when putting it together.  And it requires patience. 


I used a yeast starter called everlasting yeast.  My sweet friend Peggy, of Peggy's Pantry, had posted an interesting article on long term storage of  comfort food.  This is a subject I'm greatly interested in, and Peggy has been an angel about sharing information and resources.  She referred me to another one of her friend's sites, Jarolyn's Back to Basics:  Provident Practical Preparedness, and it was there I found an interesting article on making your own yeast.

When I did the post on homemade butter, I lamented about the cost of butter at the supermarket.  But have you seen the price of a decent looking loaf of bread?  Gasp!  Almost $6.00 here. For a loaf that is comprised of mostly air, it's $3.00.  Absolutely outrageous, in my opinion. The cost of yeast isn't exorbitant, but it's not inexpensive.  With some time and attention, you can have yeast that will last long enough to become a family heirloom, smiles.

Yet there was the tiniest issue with the everlasting yeast.  I wasn't able to find a bread recipe that specifically used it. I asked Jarolyn and she suggested I use the water and starter in place of the liquid in the recipe, and adjust the flour accordingly.  So, I had to experiment.

I loathe experimenting with recipes.  I am pretty much a recipe follower.  Oh, sure, I might add a little extra this or a little extra of that, omit an ingredient if it's something I don't like, or swap one thing for another, but that's about the extent of my creativity ~ and my courage. 

But I had a quart of starter and now I was committed to use it.  I figured I needed a big recipe because of the volume I had (and no where have I found does it say you can use less and keep the rest...but that's an experiment for another day).  I found one that worked satisfactorily, but let me cut to the chase to share the recipes for the starter and the bread, and the mixed reviews of the results.
We are talking a farm-sized recipe here.

Everlasting Yeast

1 quart (4 cups) warm, unsalted, potato water
1/2 tablespoon dry yeast (1 1/2 teaspoons)
2 tablespoons sugar
1 teaspoon salt
2 cups white or whole wheat flour

Mix all the ingredients together in a glass, plastic, or ceramic container (not stainless steel).  Loosely cover the top with a cheesecloth (I just kept the lid to my container ajar and it was fine).  Leave in a warm place to allow the mixture to ferment. I stirred it a couple of times as the ingredients will separate, and then left it overnight on the counter.  You will see it start to bubble and if you smell it, it will smell yeasty and perhaps a little like alcohol.  Don't worry.  It's supposed to.  I then put it in the refrigerator and it sat there for a couple of weeks, and I stirred it every couple of days, while I looked for a bread recipe.

The night before I wanted to use the starter, I took it out of the fridge and let it set out overnight on the counter.  Stir well just before using. Use the entire starter, reserving one third cup of the to starter for the next batch of everlasting yeast. To your one third cup of reserved starter add everything except the 1/2 tablespoon yeast, and follow the steps as explained in the beginning.

The Bread Recipe

As I said I could not find a recipe that specifically required the use of the everlasting yeast. The following is an adapted recipe.

1/2 cup butter melted, warm
1/2 tablespoon (1 1/2 teaspoons) salt**
1/2 cup sugar
2 large eggs slightly beaten
1 full batch of everlasting yeast (minus 1/3 cup for next batch of starter)
11 cups all purpose flour, plus more to achieve appropriate dough consistency

In a very large bowl, combine the butter, salt, sugar, beaten eggs.  Add the everlasting yeast. Mix well.

Add 3 cups of flour to the wet mixture and stir until well combined.  Add another 8 cups of flour, 2 cups at a time, mixing well in between. 

Now, at this point, the dough was still too gloppy for me, and I sifted in  1/2 cup of flour at a time, stirring with each addition, until I achieved a proper bread dough consistency.  There is where prior experience and a feel for bread making is important.  I can't tell you how much I added, but it was probably another 2 cups and even then the dough was very soft, more like a stiff batter dough, definitely too wet to knead.  At the risk of making the dough too heavy with flour and ending up with a doorstop I decided it was enough.  Plus, I had qualms on  how well the everlasting yeast would work in making the bread rise.

I greased my bowl and let the dough rise, until double in size, 90-120 minutes.  I punched it down, and divided the dough into thirds, putting two of the thirds in  greased 8x5 loaf pans and making a round loaf (slashing the top for decoration) with the remainder.  Let the dough rise a second time, until double in size, another 90 minutes or so.  Dough rose beautifully, but more slowly than "conventional" yeast breads.

Towards the end of the second rise, preheat the oven to 375*F.  Put the loaves on the middle rack and bake for approximately 45 minutes or until they are a deep golden brown and sound hollow when tapped. Remove from the bread from the oven and turn out onto wire racks to cool completely.

This made 3 loaves of bread, but only because I used one portion to make a round loaf.  That last portion could have been divided into 2 loaves, for a total of 4.

Bread Review:  The first thing we noticed is that the bread was not salty enough.  I followed the original recipe using only the 1 1/2 teaspoons salt and the bread was bland.  (I've since made another batch of bread using the starter,  1/2 white and 1/2 whole wheat, and a full 1 tablespoon of salt and  it was very good!). 

The bread was not particularly beautiful to look at, smiles.  It looks rustic but not artisan, if you know what I mean.  Perhaps it needs an egg wash to give it a bit of a glaze or some melted butter after it comes out of the oven.

This bread keeps very well.  Even after a week, the first loaf I had cut into still seemed fresh (though I wonder if credit could be due in part to those special amber colored bags produced just for preserving bread).  Also, while I generally don't like frozen bread, this bread froze and thawed beautifully without loss of flavor or texture.

As I hinted above, I have made a second batch of bread, with some changes and greater success.  I'll share that story in another post.  

Friday, September 2, 2011

Potato Pizza

I was having one of those blue, low energy, need-lots-of-carb days, and boy, oh boy, does this delicious pizza fill the need and then some.  If you are one who likes stuffed or twice baked potatoes and pizza, I believe you will enjoy this.  This pizza combines the best of two worlds and was a winner with both me and Sweetie-Pi.


The original recipe said to bake the potatoes; I boiled mine in unsalted water, but only because I wanted the potato water for something else I was making (everlasting yeast, a post to come soon).  For those who are in a hurry, the microwave would work well here. I think this recipe is pretty flexible; add more bacon, substitute with sausage, onions instead of the scallions.  Whatever you like on your baked stuffed potatoes would probably work here. I skimmed through the reviews on Allrecipes, and some of the folks said they used half sour cream and half ranch dressing.  Now doesn't that sound tasty!
I use an easy and simple pizza crust recipe  (found here)  that  requires no rise time and no kneading.  I have given up attempting to duplicate the wood-fired oven, pizza parlor pizza  (no wood-fired oven for starters and I don't own a pizza stone either)  so I've settled for ease and convenience as well as a good homemade bready crust.  This crust is thick enough to hold the heartiest of toppings.
Baked Potato Pizza
(adapted from  Allrecipes.Com)

Your favorite prepared pizza crust or recipe

3 medium potatoes, unpeeled, baked and cooled, cubed
1 tablespoon butter, melted
1/4 teaspoon garlic powder
1/4 teaspoon dried Italian seasoning (I used a mix of thyme, basil, basil)
1 cup sour cream
6 bacon strips, cooked and crumbled
3 green onions (scallions), chopped
1 1/2 cups shredded mozzarella
1/2 cup shredded Cheddar cheese

Have a crust ready to go in a 14" round pizza crust pan.** (Make sure you have a bit of a rim on the crust because the toppings you are going to put on are going to make a thick pizza.)  Bake for 400*F for 5 to 6 minutes or until crust starts to brown and feels just firm to the touch.  Remove from oven and set aside.

In the meantime, put the cubed potatoes in a large bowl.  Toss with the melted butter, garlic powder, and seasoning. 

Spread the sour cream over the pizza crust; top with the potato mixture and then scatter the bacon, green onion over that, and add the grated cheeses over all. 

Bake at 400*F for 15-20 minutes or until the cheese is golden brown.  Remove from the oven and let rest for five minutes before cutting into slices.

**Okay, I don't have a wood-fired oven, a pizza stone, and I don't have a pizza pan.  I just use my rimmed cookie sheet for a pizza pan and have a rectangular pizza, cut into squares to serve.  Tastes the same no matter how it's sliced, grins.  The crust recipe doesn't quite fill the pan from side to side, but that may be because I don't stretch it as thin as some might.  We tend to like a thicker crust for homemade pizzas and considering the weight of the toppings on this pizza, I would urge you to consider it if you are one who prefers a thin crust.

Pizza Crust
(found on Food.com)

1 1/4 ounce package yeast (equals 2 1/4 teaspoons)
1 cup water, warmed to about 110*F
2 1/2 cups flour
2 teaspoons olive oil
1 teaspoon sugar
1 teaspoon salt
Cornmeal for the pan, nice but not necessary

In a medium sized bowl, combine the yeast and water and stir to dissolve. The yeast should start to bubble after a minute or so.

Add the remaining ingredients and mix well.  Allow to rest for five minutes.

Sprinkle the cornmeal if you're using it on the bottom of the pan.  Press and gently stretch the dough into the pan.  (I might oil my  hands a little to give the dough a little more ease.) 

Bake at 450*F for 15 minutes or until golden brown.

Sunday, July 31, 2011

Cinnamon Biscuit Fans

I've made cinnamon biscuits for you before, but I was intrigued with the fan presentation of these.  Who can resist the sweet layers of cinnamon and sugar in these pretty breakfast  fan biscuits?  These look fussy to make but are easy peasy, lemon squeezy to make.  A knife, a ruler, and a muffin tin, a bowl, and you are nearly there! Let me show you how.

Cinnamon Biscuits Fans
(BettyCrocker.com)

Makes 8 Biscuits

For the Biscuits
2 cups flour
2 tablespoons granulated sugar
3 teaspoons baking powder
1/2 teaspoon salt
1/3 cup butter, cold (equal to 16 teaspoons, or 5 tablespoons + 1 teaspoon)
3/4 cup milk

For the Filling
3 tablespoons butter or margarine, softened
3 tablespoons granulated sugar
1 teaspoon ground cinnamon

For the Glaze
1/2 cup powdered sugar (confectioners' sugar)
1/4 teaspoon vanilla
2 to 3 teaspoons milk (or amount required to drizzle)

Preheat oven to 425*F. Grease 8 regular sized muffin cups. 

In a large bowl, mix the flour, 2 tablespoons granulated sugar, baking powder and salt.  Cut in the firm butter using a pastry blender (or pulling 2 table knives through the ingredients in opposite directions), until the mixture resembles fine crumbs.  Stir in just enough milk so the dough leaves the side of the bowl and forms a ball. 

The the dough onto a lightly flowered surface.  Knead lightly 10 times.


On a lightfly floured surface, roll dough into 12 x 10 inch rectangle.


Spread 3 tablespoons butter over rectangle.  Mix 3 tablespoons granulated sugar and the cinnamon and sprinkle over the rectangle.


With the long side of the rectangle facing you, cut crosswise into six 10" x 2" strips.  


Stacks strips.  Cut strips crosswise into eight pieces.

I cut in half, lay the two stacks of strips in front of me, cut stacks in half again, cut in half again. 

Place cut sides up in muffin cups.

Bake 15-18 minutes or until golden brown.  Immediately remove from muffin cups to cooling rack.


In medium bowl combine all the glaze ingredients and stir until smooth and thin enough to drizzle.  Place the cooling rack over a large plate lor cookie sheet to catch any dripping glaze (I just rested my cooling rack on  my muffin tin ~ no point in dirtying up another dish.).  Drizzle glaze over warm biscuits.  Serve warm.

I hope you enjoy these.  These are quite sweet, but go down a treat!

Tuesday, June 7, 2011

Really, Really, Really Good Blueberry Muffins


I may have mentioned a while back that my friend Alice T. asked me if I had a really good blueberry muffin recipe.  Truth was, I didn't, which sent me on a quest to find one. While I accept that everyone has their own opinion of  what is "best,"  I tried several  so-named best recipes from different sources, only to be disappointed with leaden or sodden lumps of dough with blueberries interspersed.  I began to believe I was seeking an ideal which lived only in my imagination:  fluffy, blueberry-goodness, in a muffin form, not too sweet (so that let out anything with a strudel  topping), and without crazy ingredients or procedures.  I had a favorite, blueberry tea bread, so why would I need a blueberry muffin recipe.  Well, I just did and so did my friend Alice.

This morning,  I discovered a really, really, really good blueberry muffin recipe.  It's reportedly from Cooks Illustrated, which was my reason for trying just one more recipe; they call it their Best Blueberry Muffin.  I messed up on following the directions, and these muffins still came out moist, fluffy, blueberry-good!  I'm just sayin' the search stops here as far as I'm concerned.  Alice, you have to try these!

Really, Really, Really Good Blueberry Muffins
(found on food.com)

2 cups unbleached, all-purpose flour
1 tablespoon baking powder
1/2 teaspoon salt
1 large egg
1 cup sugar
4 tablespoons unsalted butter, melted and slightly cooled
1 1/4 cups sour cream
1 1/2 cups frozen blueberries, preferably the small, wild kind

Put your baking rack in the middle of the oven and preheat to 350*F.  Spray  a standard muffin tin** with nonstick cooking spray.

In a medium-sized bowl, whisk together the flour, baking powder, and salt (or you could just sift all the ingredients together).

In a second medium-sized bowl, whisk the egg until it is light-colored, about 20 seconds. Add the sugar and whisk until well combined, about 30 seconds.  Add the butter in 2-3 additions, whisking well to combine after each addition. Add the sour cream in 2 additions, whisking until just combined.

Add the frozen berries to the dry ingredients and gently toss to combine.  Add the sour cream and fold with a rubber spatula until batter comes together and berries are evenly distributed, about 25-30 seconds.  There may be some small streaks of flour but that's okay; it's more important not to overmix.

Fill your muffin tins about 1/2 to 2/3 full.  Bake until it's a beautiful golden color or a toothpick inserted in the center comes out clean, about 25-30 minutes.   It's okay if a little blueberry clings to to the toothpick, that may be inevitable, just look to insure that there is no wet batter.

Turn the muffins out onto a wire rack, turn right side up, and allow to cool for several minutes before enjoying.

**My Notes:  Well, as I said, I messed up following the directions, assuming, erroneously that I already knew what I was supposed to do. HA!  I added all the dry ingredients in the first bowl (the sugar should  have been in the second bowl), beat the egg, sour cream, and salted butter in the second.  (I did reduce the salt to 1/4 teaspoon to allow for the salt in the butter.)  I tossed the still-frozen blueberries in a little flour to give the batter something to stick to so the blueberries wouldn't all sink to the bottom.  I added the dry ingredients to the wet ingredients (mixed ever so gently in 2 additions, I did see that!), and then folded in the blueberries.

The recipe states to use a standard sized muffin tin, but I found I had enough batter to make 18 muffins that  crowned nicely without spilling over the top, as I'm not keen on that muffin-top look and clean-up. 

Friday, April 29, 2011

Cinnamon Loaf

I know I've said it before, but I have to say it again.  Sometimes, the simplest of recipes are simply the best, and here is proof in point.  This breakfast treat is made with everyday ingredients, is moist, tender, (it was the moist~tender qualities of this beautiful loaf that really won me over) and with a generous amount of sugar-cinnamon struesel.  It has to sit overnight before cutting, so is a perfect recipe for a tote-along for a breakfast treat or to have ready for guests the next morning.

Jannett, of Canadian Baker Too, shared this keeper recipe.  When Jannett says she's made this many times over the years, I can believe her, as I know I'll be making this many more times as well.  Thank you for sharing this Jannett; we loved this!

Janette says you can use any size loaf pan, and I grabbed my 11 inch x 7 inch baking dish.  I should have used a loaf pan, because I think it made a difference in the texture of the cake.  Jannett's loaf looks like it has a fine crumb, mine looks a little more rustic. I reduced the cooking time for my size pan to about 23 minutes. 

Cinnamon Loaf
(adapted from Canadian Baker Too)

For the loaf:
1/2 cup butter
2 eggs
1 cup granulated sugar
2 cups unbleached flour
pinch salt
1 teaspoon baking powder
1/2 teaspoon baking soda
2 teaspoon vanilla extract
1 cup soured milk (one teaspoon vinegar with enough added milk to equal 1 cup)

For the filling and topping:
3 tablespoons brown sugar
1 tablespoon cinnamon

Preheat oven to 350*F.  Generously grease a loaf pan of your choice.

In measuring cup add milk and the vinegar. Let sit for about five minutes to give the milk an opportunity to sour.  Add vanilla. Set aside.

In small bowl combine brown sugar and cinnamon and mix. Set aside.

In your mixer add butter and sugar;  mix until light and creamy. Add one egg at a time and mix until combined.

Add your dry ingredients alternately with sour milk (beginning and ending with dry ingredients, divide~eyeball~ the dry ingredients into thirds, and add the milk by halves.)   Do not over mix this mixture.

Add half the batter to your loaf pan.  Sprinkle cinnamon mixture onto this batter.  Add remaining batter and sprinkle with the remaining cinnamon mixture.

Bake 1 hour or until tooth pick comes out clean.** Let cool in loaf pan for a least 1 hour.  Remove and place on cooling rack to cool completely.  It is best to cut this loaf the next day.
NOTE:  The one hour baking time is for a loaf pan.  I used an 11 inch x 7 inch baking dish and the baking time was reduced to about 23 minutes. 

Once again, Jannett, thank you so much for sharing this delicious recipe.  I am so pleased to be able to share this treasure this with my friends and family!

Thursday, April 14, 2011

Cinnamon Love Knots

Aaaaaah, Sundays!  Don't you just love something sweet and warm and cinnamony for Sunday breakfasts?  Sundays seem to be the one day of the week when we aren't rushing around, eating on the run, making do with whatever we can find, even if it's last night's leftover dinner!  It's also the one day of the week when I seem to have the extra time I need to make something a little special for us.

Sweetie-Pi was standing at our kitchen island, took one bite and stated, "Think I'll sit down and enjoy a cup of coffee with these.  They are too good to just gobble down." 

I won't kid you into believing that these are quick.  Quite the opposite ~ I found that making the individual ropes, dipping them into butter and the cinnamon-sugar mixture, and then tying them into knots took far longer than I expected.  These were good, but I think I'd only do them again for a brunch. 


For the knots:
2 packages (1/4 ounce each) active dry yeast
1/2 cup warm water (110° to 115°)
1/2 cup warm milk (110° to 115°)
1/2 cup butter, softened
1/2 cup sugar
2 eggs, beaten
1 teaspoon salt
4-1/2 to 5 cups all-purpose flour

For the topping:
2 cups sugar
2 tablespoons ground cinnamon
3/4 cup butter, melted

In a large bowl, dissolve yeast in water. Let stand for 5 minutes. Add milk, butter, sugar, eggs and salt. Stir in enough flour to form a stiff dough.

Turn onto a floured surface; knead until smooth and elastic, about 6-8 minutes. Place in a greased bowl, turning once to grease top. Cover and let rise in a warm place until doubled, about 1-1/2 hours.

Punch dough down; divide into three portions. Cover two portions with plastic wrap. Divide one portion into 12 balls and then roll each ball into an 8-inch rope. Combine sugar and cinnamon. Dip rope into melted butter, then coat with cinnamon-sugar mixture. Tie into a knot (as if you were tieing a shoelace). Tuck and pinch ends under and place on ungreased baking sheets. (I brought the ends up and over the top of the knot, and tucked them betneath the knot.  It may take a little stretching of the dough.)  Repeat with remaining dough. Cover and let rise until doubled, about 30 minutes.

Bake at 375° for 12-14 minutes or until golden brown. 

Makes about 3 dozen knots.

Sunday, April 3, 2011

Best Yet, Easiest Yet, Crusty Italian Bread


This crusty Italian loaf has to be the easiest, crustiest, and one of the tastiest loaves I have ever made.  It is now one of my go-to loaf breads.  And if that's not enough, there's no kneading.  Just stir the ingredients together, wait four hours for the dough to rise on your countertop, shape into a rough loaf, baguettes, rolls or even pizza, and bake. 

Look at that gorgeous crust.  The first night when I served this, the crust was crispy, chewy on the outside, soft and luxurious on the inside.  I wrapped the remaining loaf in aluminium foil the the crust softened, but the inside was still delicious and wonderfully soft on the inside.  I can't wait to try this recipe as hard rolls to serve with soup or to use it as a pizza crust.  I think it will be outstanding!

Nonna's Crusty Bread
(www.isicilian.bonrepublic.com

4 cups, all-purpose, unbleached flour (I used King Arthur's flour)
1 teaspoon salt
1 teaspoon yeast
2 cups warm water

Oven-proof baking dish or casserole containing 2-3 cups of water (to be used while baking the bread)

Combine the dry ingredients for the bread in a large bowl.  Add the 2 cups of warm water and stir to combine and forms a sticky mass. 

Cover the bowl and allow the bread ingredients to rise for about 4 hours on your counter.  The surface of the dough will have bubbles about 1/4 inch in diameter. 

Preheat your oven to 500*F.  Put your bakeware with the 2-3 cups of hot water in the oven.  Line a cookie sheet with parchment paper and set aside.

Dump your dough out onto a well-floured surface, covering the outside surface with flour as the dough is wet and sticky.  Handling the dough as little as possible (you're trying not to burst the bubbles) , shape your dough into your desired shape. 

Bake in your preheated 500*F oven for 60 minutes, or depending on your oven, more or less time.  For me, I found that 45 minutes was ample, but I also note that the ISicilian's bread is much darker than mine.  I chickened out at 45 minutes, fearing that my bread would burn to a crisp.

For more hints about using this dough, I suggest you visit the post for Nonna's Crusty Bread.  She has suggestions for keeping the dough in your refrigerator and for reheating the bread.

Sunday, February 27, 2011

Sweet Potato Bread

I used to be the only one here who ate sweet potatoes, that is, until I made this sweet potato bread.  My, my, my is it good!  It's very similar in taste and texture to a pumpkin bread, and if you didn't mention it, I suspect no one would be the wiser.  The recipe makes two loaves (with the typical hump in and the crack running down the middle of it).  It may not be pretty on the outside, but it is beautiful on the inside. 

Ole Sweetie-Pi had a recent stayover at his sister's and boyfriend's home, and I packed up some goodies for him to tote along, and a loaf of this was among them. There was some initial skepticism but then  I received phone calls and emails the next day telling me how much they all loved it.  When Ole Sweetie-Pi came home, he had to reassure himself that we still had a loaf for ourselves. 

Original recipe is on Allrecipes.  This is my adaptation. 

Sweet Potato Bread

3 sweet potatoes, cooked, (or enough to make 2 cups mashed)
2 cups sugar
4 eggs
1/2 cup vegetable oil
1/2 cup unsweetened applesauce
3/4 cup orange juice

3 1/2 cups flour
1 1/2 teaspoons salt
2 teaspoons baking powder
2 teaspoons cinnamon
2 teaspoons nutmeg
1/2 teaspoon allspice
1/2 teaspoon cloves

Prepare the sweet potatoes by first washing them. Then you have a couple of options.  I pierced three big sweet potatoes and microwaved them until soft. Or you can slice them lengthwise and place on a lightly greased baking sheet and bake at 350*F for about 30 minutes, or until soft. Allow to cool, peel, and then mash and set aside.

In a large mixing bowl, mix together the sugar, eggs, oil and applesauce.  Stir in the orange juice and the mashed sweet potatoes. 

In a separate bowl sift together the dry ingredients.  Stir the dry ingredients into the sweet potato mixture and stir until just combined, being careful not to overmix. 

Divide the batter between two generously greased 9" x 5" loaf pans.  Bake in a preheated 350*F oven for about 1 hour and 15-25 minutes or until golden brown and a toothpick inserted in the center comes out clean.

Monday, December 27, 2010

Julekake ~ Norwegian Christmas Bread


Sweetie-Pi's sister Susan is dating a man of Norwegian heritage.  Lloyd is a gentleman of courtly old world manners and demeanor, and when I say he is one of the sweetest men whom I have ever met, I do not exaggerate.  He is gracious and soft-spoken and a pure delight. When he smiles, his blue eyes sparkles and you can feel his heartlight beaming bright.   So when we were invited to their house for Christmas for an overnight stay, I wanted to do something a little special with him in mind. 

I am not familiar with Norwegian cooking and I do not have any friends who are either, so I had to rely on the internet.  As I often do, I turn to Allrecipes.com where recipe reviewers rate the recipe and often add a personal note of an ethnic recipe's authenticity.  A couple of reviewers said this recipe was much like the one in their own family archives, so I was encouraged and heartened to try.

My, my, my is this good.  Cardamon was an unknown spice to me (mainly because it can be expensive and it is not used in the typical recipes I make and I didn't want to invest in a spice that I was unsure I'd enjoy), but now I am addicted to it.  It is fragrant (almost flowery, but not) and sweet (unlike cumin or turmeric which I consider to be savory and hot).  The bread has a nice sweetness to it, but is not cloying.

You can see from this picture that this is not a tall loaf, and that initially troubled me, but once I stopped to consider that these loaves are made in a cake pan, I realized that they should be above even with the tops of the cake pan when fully baked.  Also, the directions say to allow the bread to double, approximately one hour, at both rises.  On the second rise, the bread had not doubled at the end of one hour, and I actually let it rise for two hours.  It still didn't really double, but I put it in the oven, and it finished rising as it baked.  I think the added weight of the fruit slowed the rising.

And what did Lloyd think.  Well, he took a slice and ate it.  Asked for a second slice and ate that.  He took a third slice.  "Reminds me of my mother," he said. 

Jukekake ~ Norwegian Christmas Bread
(found at Allrecipes.Com)

1 (.25 ounce) package active dry yeast
1 cup warm water (110-115*Fahrenheit)
1/2 cup sugar
1 egg
1/4 cup butter or margarine, softened
1/2 teaspoon salt
1 teaspoon ground cardamon
3 3/4 cups all-purpose flour, divided
1/2 cup raisins (I use dried currants)
1/2 cup diced citron or mixed candied fruit

Grease two 9-inch cake pans and set aside.

In a mixing bowl, dissolve the yeast in warm water.  Add the sugar, egg, butter salt, and cardamon and 2 cups of flour.  Mix well.  Stir in enough flour to make a soft dough.  Add the raisins (currants) and the citron.

Turn onto a floured surface; knead until smooth and elastic, about 6-8 minutes.  Place dough in a greased bowl, turning once to grease the top.  Cover and let rise in a warm place until doubled, about 1 hour.

Punch dough down; divide in half.  Shape each portion into a flattened ball and place one ball in each of two greased 9-inch round baking pans.  Cover and let rise in warm place until doubled, about 1 hour.

Bake at 350*F for 30-35 minutes or until golden brown.  Remove from pans to finish cooling on wire racks.

Monday, December 6, 2010

Cranberry and White Chocolate Biscotti


I just love the idea of cranberry and white chocolate; they look so festive appropriate for the season.  I took these to the office as a treat, and my workmates gave them a big thumbs up.  The flavor is much improved the second day, and  if stored in an airtight container, these biscotti will last several days. 

White Chocolate and Cranberry Biscotti
(Allrecipes.com)

1/2 cup butter (no substitutes)
1 cup sugar
4 eggs
1 teaspoon vanilla extract
3 cups all-purpose flour
1 tablespoon baking powder
3/4 cup white chocolate chips
3/4 cup dried cranberries
**1 1/2 teaspoons dried orange peel (my addition)

In a mixing bowl, cream together the softened butter and sugar.  Add eggs one at a time, beating well after each addition. Beat in vanilla.  Combine flour and baking powder gradually add to creamed mixture.  Stir in cranberries and vanilla chips (and orange peel if using) .

Divide dough into three portions.  On parchment-lined baking sheets, using your impeccably clean hands, shape each portion into a 10" x 2" rectangle.  (It may help you to slightly dampen your hands to shape the dough.)

Bake at 350*F for 20-25 minutes or until lightly browned.  Remove pan from oven and allow to cool for about 5 minutes.

Transfer loaves to cutting board; using a serrated knife cut into diagonal 1-inch slices.  Place cut side down onto baking sheet(s) and bake for an additional 15 to 20 minutes or until golden brown. 

Remove from oven, cool on wire racks.  Store in air-tight container.

Monday, November 29, 2010

Easy and Delicious Refrigerator Dinner Rolls


Holiday dinners do not seem complete without fresh, hot dinner rolls.  There is something about their yeasty fragrance mingling with other holiday aromas that beckon you to the kitchen, enticing and teasing.  They are a promise waiting to be fulfilled.


This no-knead dough can be kept in the refrigerator up to four days and they make some of the lightest, most flavorful, pleasantly sweet,  rolls you've ever tasted.  I have used this recipe for ages and have yet to find one that I like more.  This recipe makes 24 rolls, but you do not have to use the dough all at once, so you can have fresh, hot rolls for several days in a row.

To have ready for your meal, allow time to roll and form the dough and rising time and then time for baking, (generally allowing an hour for rising time, depending on how warm your kitchen is).

I made this recipe twice this past holiday.  For the family holiday, I had taken the dough out 90 minutes beforehand, to form and to raise the dough, but at the end of an hour when the dough needed to go into the oven to bake, the rolls were only three-quarters risen in the pan.  In desperation, I went ahead and baked them anyway, and thanks to the heat of the oven,  the rolls finished rising fully and beautifully. 

The second time I made them, I took the dough out 2 hours ahead of time, formed them, and allowed them to rise.  This time they started to over-rise.  I put the pan of risen rolls back into the refrigerator to slow them down and took them again when it was time to bake.  The rolls did not over proof, and once again, the rolls were gorgeous and light.

The original directions say to use a 9 x 13" pan and make 24 rolls.  However, I found that the middle rolls remained doughy and needed an additional 5-10 minutes of baking time.  I have had much better success using 2" inch high x 9" round cake pans and making 12 rolls in each pan.  I think they would be gorgeous baked into cloverleaf shape in muffin pans as well.

Refrigerator Dinner Rolls
(makes 2 dozen rolls)

1 cup warm water (105* to 115* F)
2 packages active dry yeast (not instant)
1/2 cup butter, melted
1/2 cup sugar
3 eggs
1 teaspoon salt
4- 4 1/2 cups all-purpose flour (may need more or less depending upon humidity)
additional melted butter for brushing on finished rolls, if desired

In a large bowl, combine the water and yeast and let the mixture stand until the yeast is foamy, about 5 minutes.

Stir in the butter, sugar, eggs and salt. 

Beat in the flour, one cup at a time until the dough is too stiff to mix.  Cover and refrigerate anywhere from 2 hours or up to 4 days.

Grease a 13" x 9" baking pan.  Turn the chilled dough out on a lightly floured surface.  Divide the dough into 24 equal-sized pieces.  Roll each piece into a smooth round ball.  Place balls in even rows in the prepared pan.  Cover and allow the dough to rise until doubled in bulk, about 1 hour.

Preheat your oven to 375* Fahrenheit.  Place rolls in the oven and bake until they are golden brown, 15 to 20 minutes.  Brush the warm rolls with melted butter, if desired.  Break rolls apart to serve.

Monday, November 15, 2010

Banana Bread II

This weekend three bananas, mottled with ripeness and oh-so-fragrant,  sat on my counter top.  I knew what I must do with them and yet I could not. 

You see, it's like this.  I cannot tell you how long I've looked for a simple, delicious, banana-y banana bread.  For-evah, I think.  Years, most assuredly.  I won't kid you and say that I've tried dozens of recipes; at the most I've probably only tried half a dozen.  For some time now,  I settled on a recipe that a coworker gave me; it's good, but not quite it.  I know you know what I mean.  Then  I discovered a recipe from King Arthur Flour and while I really like this one with its whole wheat goodness, I've longed for something that, truthfully, is made with white flour, the standard of my childhood. 

I have found my new go-to banana bread recipe.  It's a no-thrills, no-frills recipe, no nuts, no spices, just a little vanilla and lots of banana flavor and deliciously moist.  I think part of the success of this recipe is due to the banana and sugar being combined before the flour is added, giving the bananas and sugar an opportunity to marry and be happy,  and when the dry ingredients are finally added, the banana flavor is well dispersed.

And may I just point out one thing to you?  I am so pleased about this.  My bread baked nice and level, no raised hump with a gaping crevasse down the middle!  I owe this to a hint that I read on one of your blogs.  My apologizes ~  I do not remember who passed along the tip, but I've successfully used it several times, and it is this:  if you are using a dark aluminum baking pan (my are heavy, dark, restaurant quality pans), reduce the heat by 25 degrees Fahrenheit, same as if you are cooking in glass and follow the directions for cooking time.  The dark pans absorb the heat, browning the outside edges faster than the center, causing the center to swell and heave.  So, whoever posted that tip, thank you!

Now, here's the recipe.

Banana Bread
(Simply Recipes)

1/3 cup melted butter
3 or 4 ripe bananas, well mashed
1 cup sugar
1 egg, beaten
1 teaspoon vanilla
1 teaspoon baking soda
1 pinch salt (equals about 1/8 teaspoon)
1 1/2 cups all-purpose flour

Generously grease and flour an 8" x 4" baking pan and set aside.  Preheat oven to 350 degrees Fahrenheit. 

In a large bowl, mix the butter into the mashed bananas.  Add the sugar, egg, and vanilla and mix well.

Sprinkle the baking soda and salt over the mixture and mix in.

Add the flour, and mix to combine all.

Pour the batter into the prepared loaf pan and place in preheated oven for about 60 minutes or until toothpick inserted in center of loaf comes out clean.

Cool on rack.**  Remove from loaf pan before slicing. 

**I let my loaf sit in the pan for about ten minutes and then removed from the pan to allow it to finish cooling on the rack.

Sunday, November 7, 2010

Pumpkin-Cranberry Bread

Hello.  My name is Katy.  I stalk Coleen's of Coleen's Recipes recipes.  Virtually everything she makes I want to make too.  I can't help myself. 

This is another of her keeper recipes.

Oh my word, Coleen wasn't understanding the adjective moist when she described this delicious bread. It is super-moist!  I loved the seasonal use of ingredients, pumpkin and cranberries, as well as the generous use of spices.  No one miserly teaspoon of cinnamon here!

I only did a couple of things differently.  One I cut up the cranberries before adding them to the batter.  Two, I froze the second loaf for later.  No sharing.  Mine, mine, mine.

Pumpkin-Cranberry Bread
(Coleen's Recipes)

Grease and flour two 9"x5" loaf pans and set aside.  Preheat oven to 350*F.

Have ready two large bowls.  In the first bowl add and whisk together until well blended:

3 cups all purpose flour
3¼ teaspoons ground cinnamon
¾ teaspoon ground nutmeg
¾ teaspoon ground ginger
¼ teaspoon ground cloves
2 teaspoons baking soda
1½ teaspoon salt

In the 2nd bowl, mix until well incorporated:
3 cups granulated sugar
(1) 15 ounce can pure pumpkin (not pumpkin pie filling!)
4 eggs
1 cup vegetable oil
½ cup orange juice
2 cups fresh or frozen cranberries (added separately)

Pour the wet ingredients into the dry and mix with spoon until just moistened.  Gently stir in the cranberries.

Pour batter into prepared loaf pans and bake 60-65 minutes or until toothpick inserted in center comes out clean.
Cook in the pan for about ten minutes then release from the pans and turn them out.  Wrap the hot bread immediately in plastic wrap, covering tightly, allowing the bread to cool completely in the wrap.  This is the secret to making this bread super moist!

Sunday, October 31, 2010

English Muffin Toasting Bread

I woke up Saturday morning with every intention of making Eggs Benedict for breakfast but first I wanted to make an English muffin batter bread.  I rely on a favorite recipe from King Arthur Flour, and when I goggled it, I saw that they had another version, this time using instant yeast and not active dry yeast.  Immediately I was intrigued, and as I have both types of yeast in bulk, on hand, I chose the (new to me) version.

Let's just say that the Eggs Benedict were never made.  The aroma of the freshly baking bread woke up Ole Sweetie-Pi from a heavy sleep, and he came downstairs to see what all the good smells were about.  He virtually pounced on the still steaming loaf as I set it on a rack to cool, cut two thick slabs, toasted them, and slathered on melting butter. 

English Muffin Toasting Bread
(King Arthur Flour)
Makes one 8 x 4 loaf

3 cups all purpose flour
1 tablespoon sugar
1 1/2 teaspoons salt
1/4 teaspoon baking soda
1 tablespoon instant yeast
1 cup milk
1/4 cup water
2 tablespoons vegetable oil or olive oil
cornmeal, to sprinkle in pan

In a large bowl, combine and whisk together the flour, sugar, salt, baking soda, and yeast.

In a microwavable container for your microwave or using a small saucepan  for your stove top, combine the milk, water and oil.  Heat until temperature reaches 120*F to 130*F.  Add the wet ingredients to the dry ingredients.  Beat at high speed for one minute. (see my note)

Scoop the dough into the pan, and level as best as you can, you may have to pull or stretch it a bit.  Cover the pan and let rise in a warm place about 45 minutes to an hour, or until the dough rises approximately 1/4 inch over the rim of the pan.  Remove the cover.

Preheat your oven to 400*F and bake the risen dough 20-22 minutes, until it's golden brown, sounds hollow when it's thumped, or has an internal temperature of 190*, if you are using a thermometer.

Remove the loaf from the pan and place on a rack and allow to cool thoroughly. 

**Note
The recipe at the KAF website describes this dough as soft and scoopable.  This was not my experience and as a result mixed the dough with a large spatula and quickly kneaded it. There was no way I was going to be able to use a mixer for this dough without burning out the mixer's motor, smiles.  I read through some of the comments by other reviewers and saw that someone else had the same experience and the response was that perhaps too much flour was used because the baker just scooped the flour, not fluff and sprinkle and level into their measure.  Guilty.  I scooped and leveled, but did not aerate the flour first by fluffing it and sprinkling the flour into the measuring cup.  Live and learn.  Bread was still good though, smiles.